Monday, November 12, 2018
Sunday, November 11, 2018
Wednesday, February 28, 2018
BMW FEMBDC New Key Programming by YH BMW FEM Programmer
Here comes the easy step by step guide on how to use YH BMW FEM Programmer to add key for BMW FEM/BDC vehicle models.
Summary:
Preparation
Step 1:Backup(read) coding data
Step 2:Update ECU
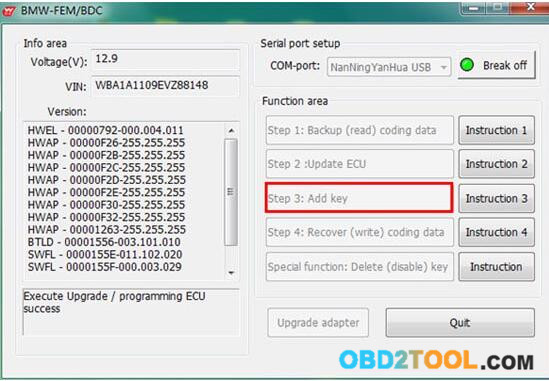
Step 3:Add key
Step 4:Recover(write) coding data
Preparation:
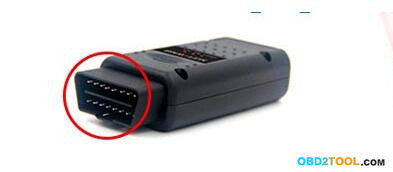
Connect the OBD2 socket of BMW FEM BDC to vehicle.

Here comes the easy step by step guide on how to use YH BMW FEM programmer to add key for BMW FEM/BDC vehicle models. Summary: Preparation
Step 1:Backup(read) coding data
Step 2:Update ECU
Step 3:Add key
Step 4:Recover(write) coding data Preparation:
Connect the OBD2 socket of BMW FEM BDC to vehicle.
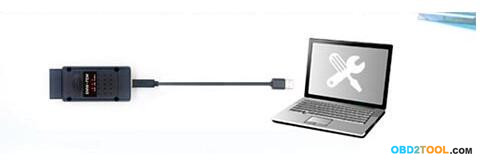
1 Connect the USB cable of Yanhua BMW FEM Key Programmer with laptop
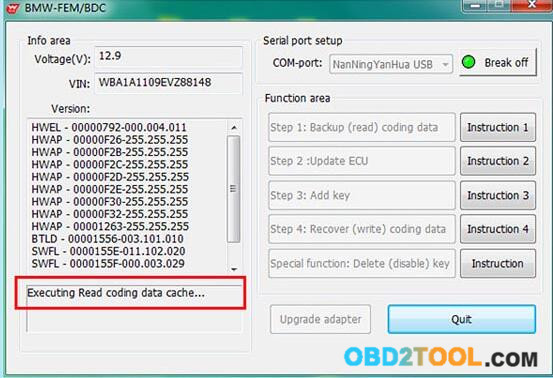
2 Turn on the ignition,keep the vehicle battery voltage on less than 13.0 V. Step 1:Backup(read) coding data Perform “Backup(read) coding data”,and save the data.
3 Wait for system “Executing read coding data cache…”
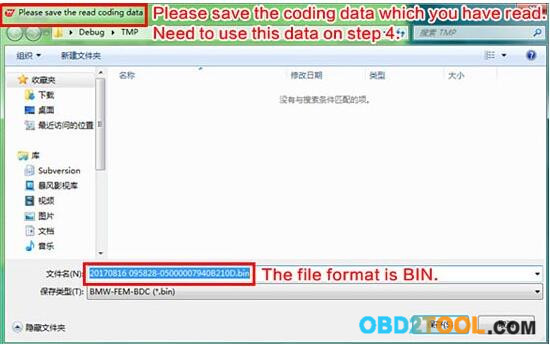
4 After data reading complete,save the data file on your laptop.The data file you saved is use for Step 4.Check the file data format,it is BIN.
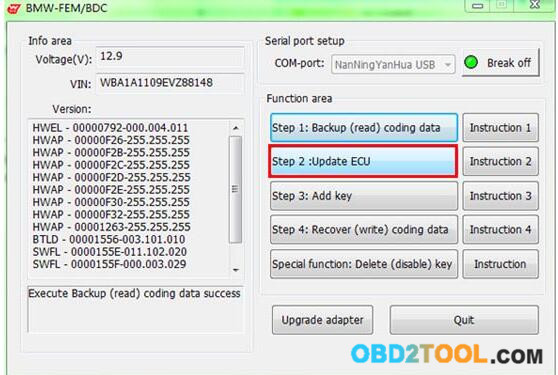
5 Step 2:Update ECU. Open the vehicle switch,click the Step 2 button to update ECU
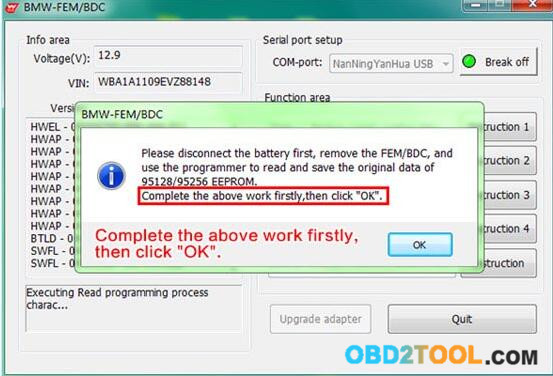
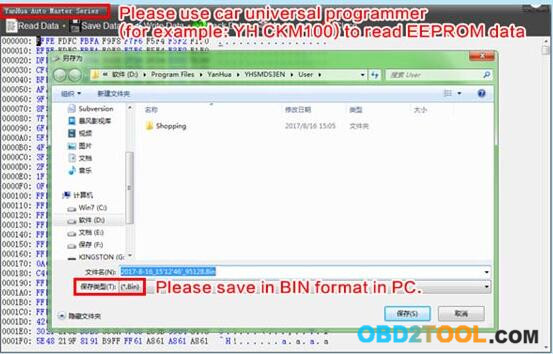
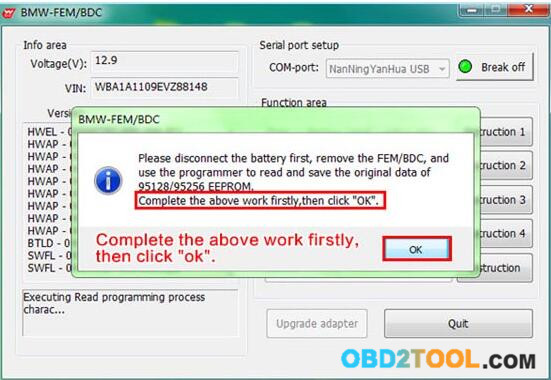
6 Software pop-up the follow tips,please follow instructions to disconnect battery and other charging device,remove the FEM/BDC,use car universal programmer(for example:YH CKM100) to read EEPROM data,save in BIN format in PC.
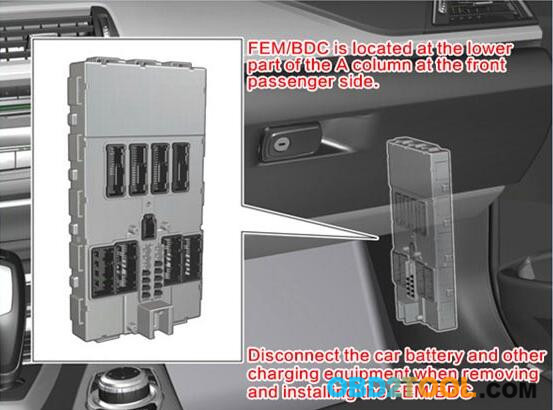
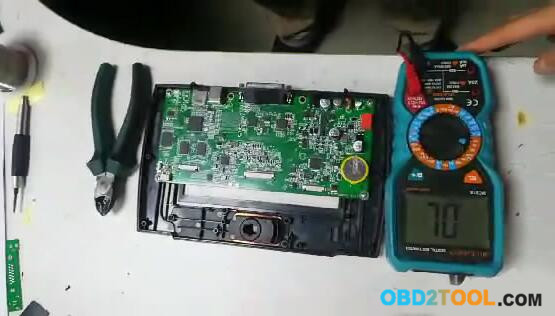
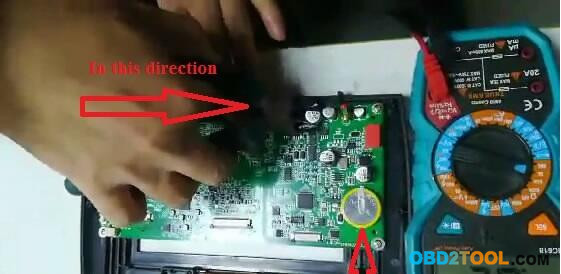
7 Remove the FEM/BDC. The FEM/BDC is located at the lower part of the A column at the front passenger side. Note:Disconnect the car battery and other charging equipment when removing and installing the FEM/BDC.
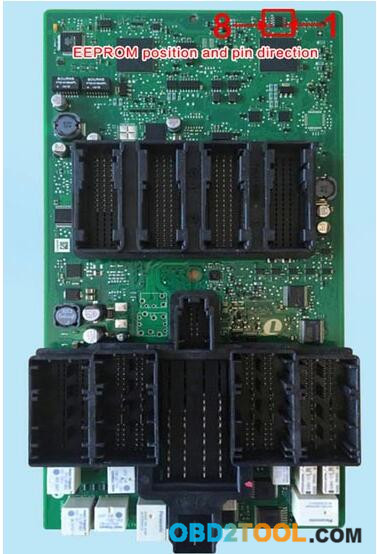
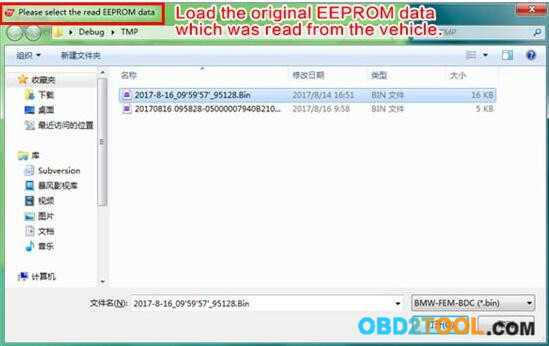
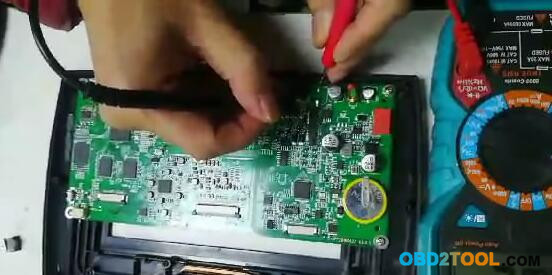
8 EEPROM position and pin direction 9 Please use car universal programmer,such as YH CKM100 to read out EEPROM data,and save the data file on your laptop. 10 After finishing above operations,please go back to the YH BMW FEM/BDC software interface and click “Ok”.
11 The software will prompt to load the original EEPROM data which was read from the vehicle by programmer.
12 Then system will calculate the corresponding new EEPROM data and prompts the user to save ti.(Save in BIN format as well)
13 The software prompts to write the newly generated EEPROM data back to EEPROM chip.Solder the EEPROM back to FEM/BDC.Install the FEM/BDC back to vehicle.Recover normal power supply for vehicle and turn on the ignition. Step 3:Add Key Turn on the ignition,click “Step 3: Add key”
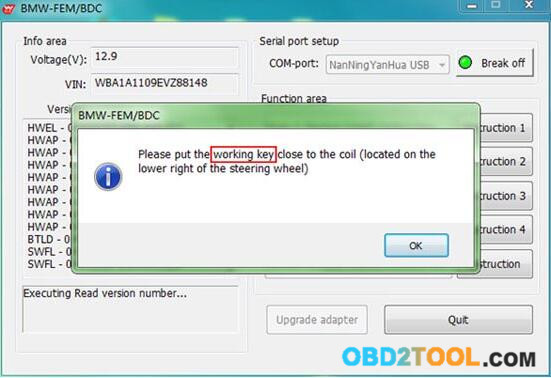
14 According to the software prompt,put the working key close to the coil(located on the lower right of the steering wheel).
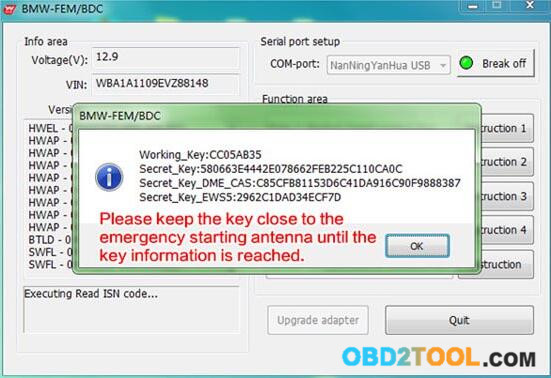
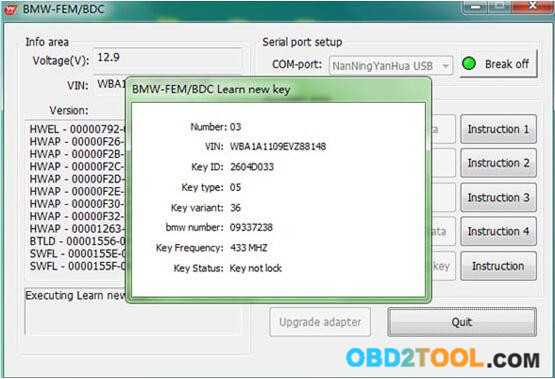
15 The software reads and displays the relevant information about the working key. Note:Keep the key close to the emergency starting antenna until the key information is reached.
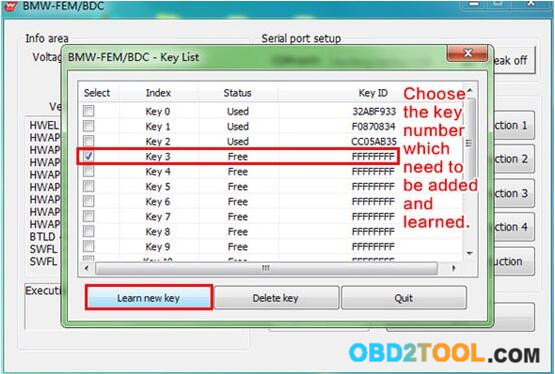
16 Then software will pop-up key list,the user can choose key which need to be added.Learn the key number and click “Learn new key”(Recommend to use the key number sequentially and in turn)
17 According to the software prompt,the new key is close to the emergency starting induction antenna(located on the lower right of the steering wheel)
18 Key information will be showed after the new key is close to emergency start antenna.
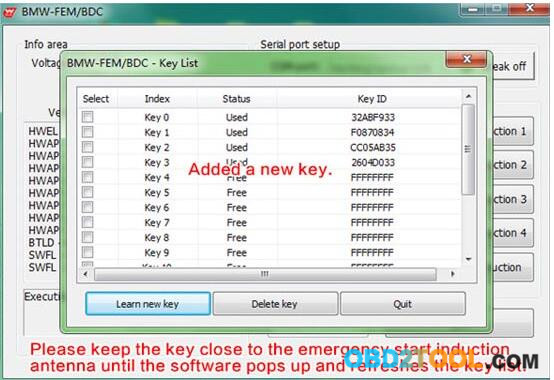
19 After adding the key and learning,the software returns and refreshes the key list.Users can continue to add and learn more keys at this interface.If completed,click “Quit” Note:Please keep the key close to the emergency start induction antenna until the software pops up and refreshes the key list.
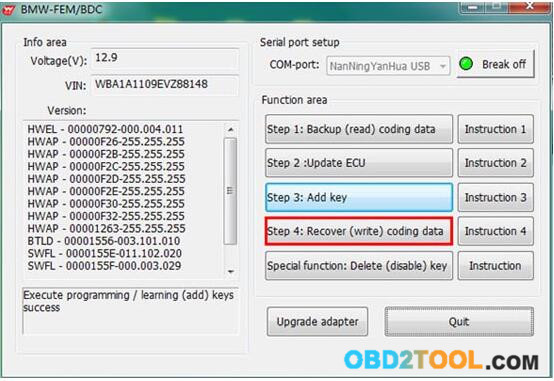
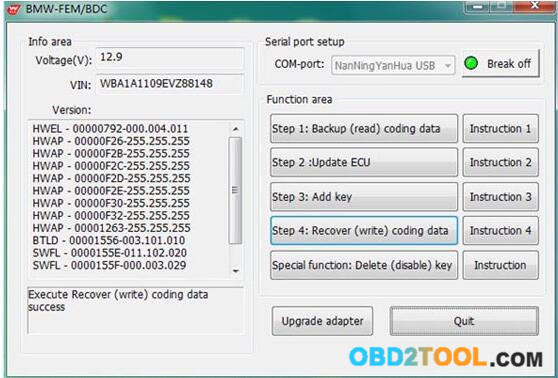
20 Step 4:Recover(Write) coding data Open the vehicle switch,click “Step 4:Recover(Write) coding data” button
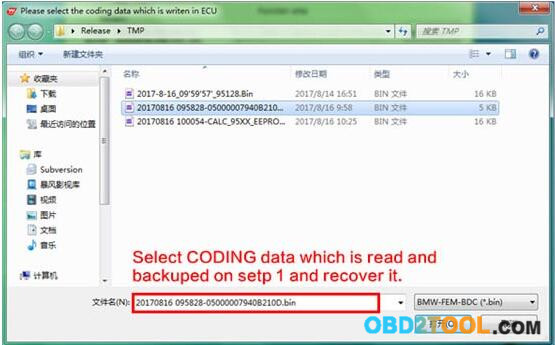
21 Select the first backup coding data of the vehicle,recover it.
22 Successful recover coding data.Make full testing of vehicles and keys.
23 Test the remote control function of the key. Test the switch,engine start function of the key.
Connect the USB cable of YH BMW FEM BDC with laptop

Turn on the ignition,keep the vehicle battery voltage on less than 13.0 V.
Step 1:Backup(read) coding data
Perform “Backup(read) coding data”,and save the data.

Wait for system “Executing read coding data cache…”

After data reading complete,save the data file on your laptop.The data file you saved is use for Step 4.Check the file data format,it is BIN.

Step 2:Update ECU.
Open the vehicle switch,click the Step 2 button to update ECU

Software pop-up the follow tips,please follow instructions to disconnect battery and other charging device,remove the FEM/BDC,use car universal programmer(for example:YH CKM100) to read EEPROM data,save in BIN format in PC.

Remove the FEM/BDC.
The FEM/BDC is located at the lower part of the A column at the front passenger side.
Note:Disconnect the car battery and other charging equipment when removing and installing the FEM/BDC.

EEPROM position and pin direction

Please use car universal programmer,such as YH CKM100 to read out EEPROM data,and save the data file on your laptop.

After finishing above operations,please go back to the YH BMW FEM/BDC software interface and click “Ok”.

The software will prompt to load the original EEPROM data which was read from the vehicle by programmer.

Then system will calculate the corresponding new EEPROM data and prompts the user to save ti.(Save in BIN format as well)

The software prompts to write the newly generated EEPROM data back to EEPROM chip.Solder the EEPROM back to FEM/BDC.Install the FEM/BDC back to vehicle.Recover normal power supply for vehicle and turn on the ignition.
Step 3:Add Key
Turn on the ignition,click “Step 3: Add key”

According to the software prompt,put the working key close to the coil(located on the lower right of the steering wheel).

The software reads and displays the relevant information about the working key.
Note:Keep the key close to the emergency starting antenna until the key information is reached.

Then software will pop-up key list,the user can choose key which need to be added.Learn the key number and click “Learn new key”(Recommend to use the key number sequentially and in turn)

According to the software prompt,the new key is close to the emergency starting induction antenna(located on the lower right of the steering wheel)

Key information will be showed after the new key is close to emergency start antenna.

After adding the key and learning,the software returns and refreshes the key list.Users can continue to add and learn more keys at this interface.If completed,click “Quit”
Note:Please keep the key close to the emergency start induction antenna until the software pops up and refreshes the key list.

Step 4:Recover(Write) coding data
Open the vehicle switch,click “Step 4:Recover(Write) coding data” button

Select the first backup coding data of the vehicle,recover it.

Successful recover coding data.Make full testing of vehicles and keys.

Test the remote control function of the key.
Test the switch,engine start function of the key.
Summary:
Preparation
Step 1:Backup(read) coding data
Step 2:Update ECU
Step 3:Add key
Step 4:Recover(write) coding data
Preparation:
Connect the OBD2 socket of BMW FEM BDC to vehicle.
Here comes the easy step by step guide on how to use YH BMW FEM programmer to add key for BMW FEM/BDC vehicle models. Summary: Preparation
Step 1:Backup(read) coding data
Step 2:Update ECU
Step 3:Add key
Step 4:Recover(write) coding data Preparation:
Connect the OBD2 socket of BMW FEM BDC to vehicle.
1 Connect the USB cable of Yanhua BMW FEM Key Programmer with laptop
2 Turn on the ignition,keep the vehicle battery voltage on less than 13.0 V. Step 1:Backup(read) coding data Perform “Backup(read) coding data”,and save the data.
3 Wait for system “Executing read coding data cache…”
4 After data reading complete,save the data file on your laptop.The data file you saved is use for Step 4.Check the file data format,it is BIN.
5 Step 2:Update ECU. Open the vehicle switch,click the Step 2 button to update ECU
6 Software pop-up the follow tips,please follow instructions to disconnect battery and other charging device,remove the FEM/BDC,use car universal programmer(for example:YH CKM100) to read EEPROM data,save in BIN format in PC.
7 Remove the FEM/BDC. The FEM/BDC is located at the lower part of the A column at the front passenger side. Note:Disconnect the car battery and other charging equipment when removing and installing the FEM/BDC.
8 EEPROM position and pin direction 9 Please use car universal programmer,such as YH CKM100 to read out EEPROM data,and save the data file on your laptop. 10 After finishing above operations,please go back to the YH BMW FEM/BDC software interface and click “Ok”.
11 The software will prompt to load the original EEPROM data which was read from the vehicle by programmer.
12 Then system will calculate the corresponding new EEPROM data and prompts the user to save ti.(Save in BIN format as well)
13 The software prompts to write the newly generated EEPROM data back to EEPROM chip.Solder the EEPROM back to FEM/BDC.Install the FEM/BDC back to vehicle.Recover normal power supply for vehicle and turn on the ignition. Step 3:Add Key Turn on the ignition,click “Step 3: Add key”
14 According to the software prompt,put the working key close to the coil(located on the lower right of the steering wheel).
15 The software reads and displays the relevant information about the working key. Note:Keep the key close to the emergency starting antenna until the key information is reached.
16 Then software will pop-up key list,the user can choose key which need to be added.Learn the key number and click “Learn new key”(Recommend to use the key number sequentially and in turn)
17 According to the software prompt,the new key is close to the emergency starting induction antenna(located on the lower right of the steering wheel)
18 Key information will be showed after the new key is close to emergency start antenna.
19 After adding the key and learning,the software returns and refreshes the key list.Users can continue to add and learn more keys at this interface.If completed,click “Quit” Note:Please keep the key close to the emergency start induction antenna until the software pops up and refreshes the key list.
20 Step 4:Recover(Write) coding data Open the vehicle switch,click “Step 4:Recover(Write) coding data” button
21 Select the first backup coding data of the vehicle,recover it.
22 Successful recover coding data.Make full testing of vehicles and keys.
23 Test the remote control function of the key. Test the switch,engine start function of the key.
Connect the USB cable of YH BMW FEM BDC with laptop
Turn on the ignition,keep the vehicle battery voltage on less than 13.0 V.
Step 1:Backup(read) coding data
Perform “Backup(read) coding data”,and save the data.

Wait for system “Executing read coding data cache…”
After data reading complete,save the data file on your laptop.The data file you saved is use for Step 4.Check the file data format,it is BIN.
Step 2:Update ECU.
Open the vehicle switch,click the Step 2 button to update ECU
Software pop-up the follow tips,please follow instructions to disconnect battery and other charging device,remove the FEM/BDC,use car universal programmer(for example:YH CKM100) to read EEPROM data,save in BIN format in PC.
Remove the FEM/BDC.
The FEM/BDC is located at the lower part of the A column at the front passenger side.
Note:Disconnect the car battery and other charging equipment when removing and installing the FEM/BDC.
EEPROM position and pin direction
Please use car universal programmer,such as YH CKM100 to read out EEPROM data,and save the data file on your laptop.
After finishing above operations,please go back to the YH BMW FEM/BDC software interface and click “Ok”.
The software will prompt to load the original EEPROM data which was read from the vehicle by programmer.
Then system will calculate the corresponding new EEPROM data and prompts the user to save ti.(Save in BIN format as well)
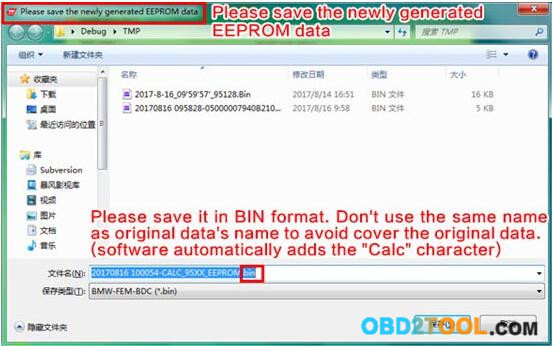
The software prompts to write the newly generated EEPROM data back to EEPROM chip.Solder the EEPROM back to FEM/BDC.Install the FEM/BDC back to vehicle.Recover normal power supply for vehicle and turn on the ignition.
Step 3:Add Key
Turn on the ignition,click “Step 3: Add key”
According to the software prompt,put the working key close to the coil(located on the lower right of the steering wheel).
The software reads and displays the relevant information about the working key.
Note:Keep the key close to the emergency starting antenna until the key information is reached.
Then software will pop-up key list,the user can choose key which need to be added.Learn the key number and click “Learn new key”(Recommend to use the key number sequentially and in turn)
According to the software prompt,the new key is close to the emergency starting induction antenna(located on the lower right of the steering wheel)

Key information will be showed after the new key is close to emergency start antenna.
After adding the key and learning,the software returns and refreshes the key list.Users can continue to add and learn more keys at this interface.If completed,click “Quit”
Note:Please keep the key close to the emergency start induction antenna until the software pops up and refreshes the key list.
Step 4:Recover(Write) coding data
Open the vehicle switch,click “Step 4:Recover(Write) coding data” button
Select the first backup coding data of the vehicle,recover it.
Successful recover coding data.Make full testing of vehicles and keys.
Test the remote control function of the key.
Test the switch,engine start function of the key.
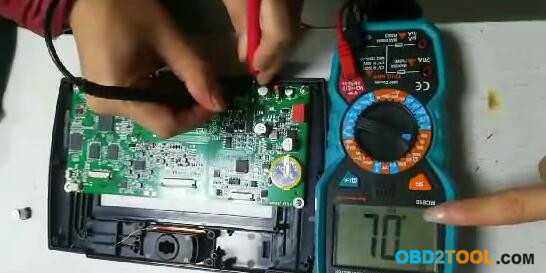
Lonsdor K518ISE remove the capacitance so you can use your power supply
Topic: how to remove the capacitance on Lonsdor K518ISE PCB so that you can use your own power supply and avoid the machine smokes.
Tools to use:
Digital multimeter
pencil
pliers

It’s Lonsdor K518ISE plate.

Tips (Very Important):
You hands are not allowed to touch any part of the OBD2 Programmer K518 plate except the yellow round one.
Please follow the below picture to operate, please pay attention to the direction.

Please be gentleto remove the capacitance.
Now we use the multimeter to test the resistance of this port and see if the resistance is right.

Done.

Tools to use:
Digital multimeter
pencil
pliers
It’s Lonsdor K518ISE plate.

Tips (Very Important):
You hands are not allowed to touch any part of the OBD2 Programmer K518 plate except the yellow round one.
Please follow the below picture to operate, please pay attention to the direction.
Please be gentleto remove the capacitance.
Now we use the multimeter to test the resistance of this port and see if the resistance is right.
Done.
Saturday, February 17, 2018
Software de actualización SKP900
1 Conecte su dispositivo a la PC mediante un cable USB y no realice ninguna operación de la siguiente manera:

2 Seleccione "FUNCIÓN ACTUALIZACIÓN" en el Menú principal y presione [SÍ]:

3 Ejecute "SuperOBD SKP-900 Update Tool.exe"
4 Presione el botón "ABRIR" para cargar el archivo de actualización->


5 Seleccione el puerto COM (DOS MANERAS PARA SELECCIONAR EL PUERTO COM) ->
5.1 Presione el botón "AUTO" (modo 1)

5.2 Elija manualmente (modo 2)

Cómo obtener el número de puerto:
"Mi PC" -> Haga clic con el botón derecho del mouse-> Administrar->:

Administrador de dispositivos->

Puertos (COM y LPT) ->

Buscar puerto serie USB->

El puerto COM es COM3
2 Seleccione "FUNCIÓN ACTUALIZACIÓN" en el Menú principal y presione [SÍ]:
3 Ejecute "SuperOBD SKP-900 Update Tool.exe"
4 Presione el botón "ABRIR" para cargar el archivo de actualización->
5 Seleccione el puerto COM (DOS MANERAS PARA SELECCIONAR EL PUERTO COM) ->
5.1 Presione el botón "AUTO" (modo 1)
5.2 Elija manualmente (modo 2)
Cómo obtener el número de puerto:
"Mi PC" -> Haga clic con el botón derecho del mouse-> Administrar->:
Administrador de dispositivos->
Puertos (COM y LPT) ->
Buscar puerto serie USB->
El puerto COM es COM3
SKP900 Install Driver
Por
primera vez, para conectar su SKP900 con una PC a través de un
cable USB, la pantalla de la computadora le recordará que debe instalar
el controlador USB de la siguiente manera:

Cambiar selección->

Siguiente->

Siguiente->

Examine la carpeta del controlador USB->
 OK->
OK->


Continuar de todos modos->


Haga clic en Finalizar, espere unos 2 segundos->

Cambiar seleccionar->

Siguiente->

Siguiente->
Haga clic en Continuar de todos modos->

Haga clic en Finalizar.

Instalación terminada
Cambiar selección->
Siguiente->
Siguiente->
Examine la carpeta del controlador USB->
OK->Continuar de todos modos->
Haga clic en Finalizar, espere unos 2 segundos->
Cambiar seleccionar->
Siguiente->
Siguiente->
Haga clic en Continuar de todos modos->
Haga clic en Finalizar.
Instalación terminada
Subscribe to:
Posts (Atom)